
Learn the Figure-Four Lock as Control Before Submission
Learn five control checkpoints, entries from guard and top positions, stage-based defense, troubleshooting, transitions, and safe drilling.
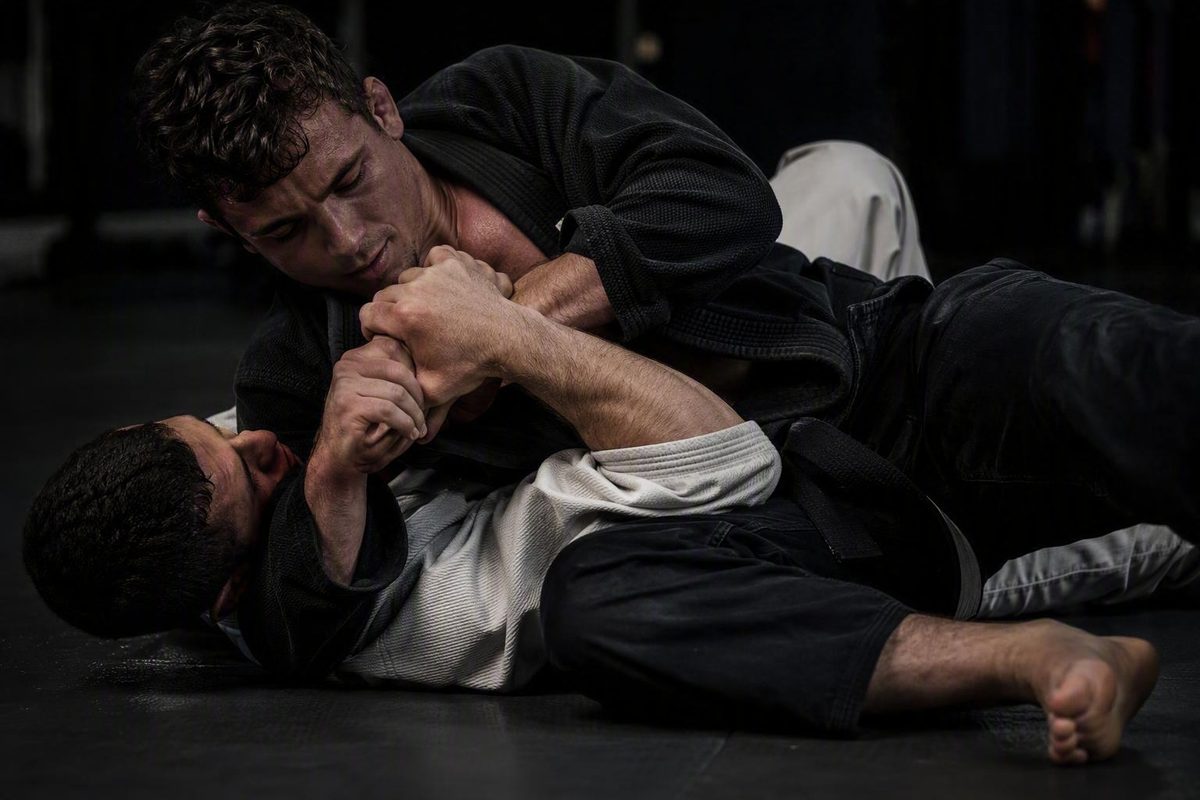
The BJJ Kimura is often introduced as a shoulder lock, but that describes only its final branch. Its value begins earlier: the figure-four connection can isolate an arm, restrict torso rotation, and create leverage for positional improvement even when no safe submission is available.
A sound Kimura is not built by dragging an opponent’s arm behind their back. It is built by retaining the wrist, containing the elbow, controlling the shoulder line, removing space, creating an angle, and rotating with the torso and hips.
This guide covers those mechanics, common positions, stage-based defense, troubleshooting, and safe supervised practice. It is published for the recreational trainees served by MMA Spark, but it does not replace direct instruction or medical assessment. No written article can evaluate your partner, your joint alignment, or the pressure being applied in real time.
Related: First Month of MMA Training: What to Expect.
What the Kimura Is—and What It Does to the Arm
A Kimura is a bent-arm figure-four lock. One of your hands controls the opponent’s wrist. Your other arm wraps around their upper arm, and that second hand connects to your own wrist. The resulting frame links both of your arms to one of theirs.
Directing the opponent’s hand behind their back creates internal rotation at the shoulder. The shoulder is usually the primary target, but the elbow can also be stressed depending on the arm’s alignment, the attacking angle, the position, and how the defender resists. A physical-therapy clinic overview identifies the shoulder and elbow as the primary injury locations while also acknowledging that Kimura-specific biomechanical research is limited (Western Slope Rehab and Performance’s Kimura injury overview).
An elbow bend near 90 degrees appears in instructional descriptions as a useful teaching reference, not a universal finishing measurement. Body proportions, shoulder position, defensive grips, and whether the attack comes from guard, side control, mount, or north-south all change the geometry (Digitsu’s Kimura mechanics overview).
The figure four works because each part has a separate job:
- Wrist control retains the end of the lever. If the wrist escapes or turns freely, the defender can change the arm’s orientation and begin reconnecting it to the torso.
- Elbow isolation controls the middle of the lever. A mobile elbow lets the defender rotate, straighten the arm, or alter the shoulder line.
- Torso control limits whole-body escape. If the opponent can freely posture, bridge, turn, or follow the pressure, the shoulder may never become isolated.
- Space removal reduces slack. Loose arms and flared elbows create room for defensive movement.
- Angle creation aligns your body with the intended rotation. A poor angle often turns the attack into an arm curl.
- Torso and hip rotation generate controlled leverage. Your connected body should move the isolated arm; your biceps should not have to win a pulling contest.
This creates three related uses. The Kimura can be a submission, a positional control, or a platform for transitions such as sweeps, passes, turnovers, back exposure, and alternate attacks. These are not entirely separate techniques. They are branches that become available according to the position and the opponent’s reaction.
Several associated names appear across grappling traditions, including double wristlock, gyaku ude-garami, ude-garami, and chicken wing. They overlap with the BJJ Kimura, but terminology is not perfectly identical across judo, catch wrestling, BJJ, and other rulesets. The lock’s deeper historical origin remains uncertain, with both judo and catch-wrestling associations appearing in historical accounts (BJJ Heroes’ Kimura reference).
Safety Rules Before You Practice the Lock
Written instruction cannot replace a qualified coach who can see your alignment, regulate the drill, and intervene when either partner moves unsafely. This limitation is especially important with a rotational joint lock: a sequence can look technically recognizable while pressure is being applied too quickly, too far, or in the wrong direction. MMA Spark likewise states that combat sports carry injury risk and that its written material does not replace a coach watching you train (MMA Spark’s coaching and safety disclaimer).
The Kimura can injure the shoulder or elbow when rotational pressure exceeds the joint’s safe range. Severe injury is possible, but the available evidence does not establish how frequently severe outcomes occur or show that the Kimura is more dangerous than other submissions.
A figure page from a 2014 BJJ competition-injury paper reports two injuries resulting from Kimura applications and describes risk to both the shoulder and elbow. This is a small observation from one competition study—not a Kimura injury rate, a training-risk estimate, or proof of comparative danger (ResearchGate’s figure from the competition study).
Use these rules every time you drill:
- Agree on the drill, intensity, and tapping signals before starting.
- Establish the position without finishing pressure.
- Add pressure gradually enough for the defender to recognize and respond to it.
- Tap early, verbally or physically; do not wait for sharp pain.
- Release immediately when a tap occurs.
- Never wrench the arm or accelerate through resistance.
- Do not continue a finish through an uncontrolled scramble.
- Do not test a partner’s flexibility.
- Do not treat unusual mobility as permission to push farther.
- Reset whenever either partner loses track of the arm’s alignment.
The defender should not attempt a generic rolling escape simply because they have seen one used from another position. Position, grip orientation, available space, and the attacker’s torso control determine which movement is appropriate.
The attacker also needs a clear release condition. Release or transition if:
- the arm’s alignment is unclear;
- the partner cannot tap normally;
- safe shoulder movement appears to stop;
- the defender moves unpredictably;
- either person loses balance;
- positional control deteriorates; or
- completing the lock would require a jerk.
Pain should not be treated as the required signal to tap. Gradual pressure, early communication, and immediate release are therefore part of the technique—not optional etiquette.
If you suspect an injury, stop training and obtain an assessment from an appropriately qualified medical professional. Do not use an online technique guide to diagnose tissue damage, prescribe rehabilitation, or choose a return-to-training date.
Build the Grip, Then Pass Five Control Checkpoints
Form the basic connection during supervised practice:
- Control the opponent’s wrist with one hand.
- Wrap your other arm around the back of their upper arm.
- Connect the wrapping hand to your own wrist.
- Bring your elbows into a compact structure without immediately rotating the shoulder.
A thumbless or “monkey” grip appears in some instructional approaches. Other grips may be used according to position, friction, hand size, opponent movement, ruleset, and the method taught by a particular coach. Treat grip style as a variable detail, not a universal law. The essential question is whether the connection safely retains the wrist while the rest of your body controls the arm and torso.
Before adding finishing pressure, pass five checkpoints.
1. Retain the wrist
Your connection must prevent the opponent from freely withdrawing or rotating the hand. This does not mean crushing the wrist. It means maintaining a reliable attachment while moving your body.
Grip location matters.
2. Contain the elbow
The elbow is the hinge between wrist control and shoulder rotation. If it can drift, flare, or slide, the defender can change the structure of the lock. Restore its position instead of tightening your hands.
Elbow containment does not mean forcing every opponent into an identical shape. It means knowing where the elbow is and preventing it from freely escaping the control structure.
3. Control the torso or shoulder line
Use the surrounding position—your legs from guard, pressure from side control, or base from mount—to limit the opponent’s ability to turn with the attack.
This is why wrist control alone is insufficient. An opponent who can posture, rotate the torso, reconnect the elbow to the ribs, or establish a defensive grip may neutralize the shoulder attack even when the figure four appears intact.
4. Remove excess space
Keep the figure four connected and your elbows organized.
Flared elbows also weaken the structural connection. Once the elbows separate from the rest of the frame, the attacker often compensates by squeezing harder with the forearms.
5. Create the appropriate angle
Do not assume every Kimura finishes from the same orientation. Your body angle must support the position-specific direction of control. If you are square, flat, or reaching away from your base, improve your angle before rotating the arm.
Once all five checkpoints are present, keep the arm controlled and move the hand behind the back only through a safe range. Rotate smoothly with your torso or hips rather than pulling the forearm with isolated arm strength. Instructional sources consistently emphasize tight connection, body control, angle, and whole-body rotation rather than wrenching or tugging with the arms alone (wikiHow’s supervised-position mechanics).
Use this quick self-audit:
- Are my forearms exhausting immediately?
- Am I losing the surrounding position?
- Can I move only by jerking?
- Is the opponent’s torso still free?
- Has their elbow escaped my control?
If any answer is yes, stop finishing. At least one control checkpoint is probably missing.
Closed-Guard Kimura: Create the Post, Angle, and Upper-Body Control
Closed guard is a common teaching position for the Kimura, but it is not automatically the safest or easiest entry for every beginner. It is useful because the legs can help control posture and torso movement while the arms build the figure four.
A typical entry begins by disrupting posture or presenting a sweep threat. When the opponent posts a hand to avoid being tipped, establish wrist control before the hand retracts. Sit up toward the posted arm, wrap around the upper arm, and connect to your own wrist. This post-to-grip sequence, followed by posture control and angle creation, appears in common closed-guard instruction (Evolve MMA’s closed-guard Kimura overview).
The sequence is not “grab the wrist and pull the arm backward.” Think instead:
- Create or identify the post.
- Secure the wrist before it retracts.
- Break or contain posture.
- Sit up and connect the figure four.
- Turn off the opponent’s centerline.
- Use the legs and hip angle to restrict torso movement.
- Contain the elbow.
- Assess whether a safe finish or transition is available.
The opponent can posture, rotate the torso, withdraw the elbow, and place weight through you. Sit up and create an angle so your torso can move the arm as one connected unit.
Your legs are part of the attack. They help limit posture and prevent the opponent from simply rotating with the shoulder pressure. Depending on the variation taught by your coach, the legs may control the back, hip, or shoulder line.
Do not open the guard and throw a leg into place before controlling the upper body.
For a controlled finish:
- retain the wrist;
- keep the elbow isolated;
- prevent posture recovery;
- maintain leg control;
- rotate your body while guiding the hand behind the back; and
- apply pressure gradually.
If you find yourself curling the opponent’s arm toward you, revisit your angle and leg control. The finish should emerge from coordinated positioning, not a maximal pulling effort.
Common failure points include:
- staying flat beneath the opponent;
- allowing posture to recover;
- losing the wrist during the sit-up;
- leaving the elbow mobile;
- opening the guard before securing the torso;
- remaining square instead of angling out; and
- trying to finish with an arm curl.
Resistance creates a decision point. If the defender builds a strong hand connection, shifts weight, or changes posture, preserving the figure four may support a sweep or positional transition. Do not sacrifice control merely to keep chasing the shoulder lock.
Closed-guard decision tree:
- Opponent posts a hand: establish wrist control.
- Wrist, posture, elbow, legs, and angle are controlled: assess a gradual supervised finish.
- Posture control is lost: close back up or reset.
- Defender makes a strong defensive connection or shifts weight: use the reaction for a coached sweep or transition.
- Alignment becomes unclear or movement becomes explosive: release.
Top-Position Kimuras From Side Control, North-South, and Mount
Top-position Kimuras share one priority: stabilize the opponent’s torso and shoulder line before separating or rotating the arm. Top pressure can restrict movement, but only if your base remains connected to the position.
Side control
From side control, first flatten or contain the upper body. Establish wrist control, wrap the upper arm, and connect the figure four without letting the opponent turn freely underneath you.
Your head, torso, hips, or legs may help limit rotation, depending on the variation. The purpose is not to pin every part of the body simultaneously. It is to prevent the opponent’s shoulder line from simply following the lock.
Moving toward north-south or stepping around the head may improve control by changing your angle and limiting defensive turning. It can also change your balance and the shoulder’s alignment. Published side-control instruction includes flattening the opponent, securing the figure four, and changing position around the head, but the exact transition should be learned under direct coaching rather than improvised while pulling on the arm (wikiHow’s side-control and mount variations).
Side-control decision tree:
- Stabilize the torso.
- Isolate the bent arm.
- Connect the figure four.
- Assess the defender’s grips and ability to turn.
- If alignment and control are sound, apply gradual pressure.
- If the torso remains mobile, improve side control or move to a more stable angle.
- If the reaction opens a turnover, back exposure, or alternate attack, transition without forcing.
- If shoulder control is lost, release or reset.
The central failure check is simple: if the opponent can turn freely, you do not yet control the Kimura position.
North-south
North-south can let you position your body around the opponent’s shoulder line while keeping the arm connected. It may also reduce the space available for the defender to turn toward you.
However, “go to north-south” is not a complete instruction. The path matters.
Maintain the arm’s alignment, keep your base, and pause whenever you cannot account for the shoulder.
North-south decision tree:
- Stabilize the chest and shoulder line.
- Retain the wrist and elbow while changing angle.
- Rebuild a compact figure four after movement.
- Finish gradually only if the shoulder can still move through a controlled range.
- Otherwise improve control, transition, or release.
Mount
From mount, a high and stable position can help isolate a bent arm. But base comes before the submission.
Secure the arm while maintaining enough base to respond to bridging and turning. Connect the figure four only when the upper body is controlled. Some finishes involve changing leg or torso position around the opponent’s head, but those adjustments should not come at the expense of balance or safe arm alignment.
Mount decision tree:
- Establish a stable mount.
- Isolate the bent arm without leaning beyond your base.
- Connect the figure four.
- Assess bridging, defensive grips, and shoulder alignment.
- Finish gradually, move to a more stable angle, or transition.
- If your base breaks, protect mount rather than hanging on to the arm.
The common mount error is chasing the grip so aggressively that the defender can reverse the position.
Half guard
The Kimura grip can provide control from either top or bottom half guard. From bottom, it may contribute to a sweep, turnover, or back exposure. From top, it may assist a pass or help control the upper body.
Do not copy closed-guard mechanics directly into half guard. Treat half guard as its own positional problem.
Use the Kimura as a Control System, Not Just a Tap
The figure-four connection remains useful when the shoulder lock is unavailable. By linking yourself to the opponent’s wrist and upper arm, you may restrict rotation, influence posture, and create leverage for movement.
This broader idea should not be confused with a single branded curriculum. David Avellan is associated with the specifically named Kimura Trap System, but Kimura-based positional control is a wider grappling concept. One commercial instructional overview presents Kimura control across side control, north-south, half guard, closed guard, turtle, back control, and standing, with branches to sweeps, passes, back takes, and submissions (Grapplearts’ Kimura Roadmap overview).
Possible outcomes include:
- a sweep from bottom;
- a guard pass or turnover from top;
- exposure of the back;
- an armbar;
- a triangle;
- movement to a stronger pin; or
- a safe reset.
None is automatic. Defensive hand connections, posture changes, turns, and weight shifts may create opportunities, but the correct branch depends on position and timing. The grip is a steering connection, not a guarantee.
Use this hierarchy:
- Maintain safe control. Know where the wrist, elbow, and shoulder are.
- Protect your position. Do not fall, overreach, or surrender base merely to retain the grip.
- Recognize the reaction. Is the opponent turning, straightening, connecting their hands, posturing, or shifting weight?
- Select a suitable transition. Choose a branch your coach has taught for that position.
- Abandon the grip when necessary. A control is no longer useful if retaining it compromises balance or joint safety.
Do not finish when the defender has successfully aligned the arm, the shoulder cannot rotate without force, your position is collapsing, or the exchange has become uncontrolled. Resistance is information. It may indicate a transition, but it can also mean the correct decision is to let go.
A simple decision map looks like this:
| Starting situation | Control-first options |
|---|---|
| Bottom closed guard | Controlled finish, sweep, positional transition, reset, or release |
| Bottom half guard | Sweep, turnover, back exposure, reset, or release |
| Top half guard | Pass, turnover, positional improvement, alternate attack, or release |
| Side control | Gradual finish, north-south transition, back exposure, armbar, or reset |
| North-south | Gradual finish, turnover, alternate pin, or release |
| Mount | Gradual finish, armbar transition, preserve mount, or release |
The map is intentionally nonprescriptive. Your coach should supply the position-specific details and help you recognize when a theoretically available branch is unsafe.
Why Kimuras Fail: Troubleshooting by Symptom
When a Kimura stalls, diagnose what you can observe. Adding another technique before fixing the underlying control problem usually creates more confusion. Commonly identified execution errors include poor body angle, loose grips, flared elbows, insufficient upper-body control, and overreliance on arm strength (Digitsu’s Kimura troubleshooting overview).
Symptom: You keep losing the wrist
Check the initial connection and spacing. If your grip forms too far from the opponent’s hand or your elbows drift away from your body, the wrist may rotate or slip free.
Also ask whether the rest of your body is moving with the grip. Reconnect, compact your structure, and use the surrounding position to limit movement.
Symptom: The elbow remains mobile
Do not solve a floating elbow by squeezing the wrist harder. Restore elbow containment and control the opponent’s torso. If the elbow can move around your frame, the defender can change the shoulder angle and weaken the lock.
Symptom: The arm will not rotate
Stop applying pressure. Check:
- your body angle;
- the defender’s hand-to-hand, clothing, or body connection;
- whether posture has recovered;
- whether the torso can turn with the arm;
- whether the elbow has shifted; and
- whether the shoulder is aligned in a way that blocks safe rotation.
An obstruction is not permission to pull harder. Improve position, select a coached transition, or release.
Symptom: You repeatedly lose top position
Your base and torso control are failing before the submission mechanics begin. From mount, stop reaching beyond your base. From side control, stop separating the arm while the opponent can still turn freely.
Stabilize first. Then isolate. Then connect.
Symptom: Your bottom attack stalls
Check whether you are flat. Next, check posture disruption, hip angle, and leg control. A tight-looking hand grip cannot compensate for an opponent who remains upright, square, and free to rotate.
Rebuild the position instead of trying to curl the arm into place.
Symptom: Your grip burns out rapidly
You may be maintaining unnecessary isometric tension or relying on your arms to perform work that should come from angle and torso rotation. Grip exercises are suggested in some instructional material, but stronger hands do not replace wrist retention, elbow control, and sound positioning.
Practice holding the structure with the minimum pressure needed for the cooperative drill. If every repetition feels maximal, stop and ask your coach to inspect the connection.
Symptom: Every attempt becomes a scramble
Release, reset, and identify the lost checkpoint. A scramble may be tactically useful in live grappling, but it is a poor environment for learning rotational finishing pressure. If neither partner can account for the shoulder, stop treating the grip as a submission.
Before proceeding, run the checklist:
- Wrist retained
- Elbow contained
- Torso controlled
- Space removed
- Angle created
- Pressure gradual
Defending the Kimura by Stage
There is no universal Kimura escape. Defense changes according to the position, timing, grip configuration, and space available. A movement that works early may be ineffective—or unsafe—after the attacker has isolated both the arm and torso.
Stage one: Prevention
Maintain posture and keep your elbows meaningfully connected to your body. Do not leave a posted arm far from your torso longer than necessary. Deny clean wrist control and recognize when a sweep threat is being used to make you post.
From top position, posture and base help prevent the bottom player from sitting up and angling around the arm. From bottom, framing and elbow discipline can make it harder for the top player to separate your arm from your torso.
Prevention is the first defensive training priority because it gives you the most freedom to adjust before the figure four is secured.
Stage two: Grip formation
Once the attacker controls the wrist, prevent your hand from traveling behind your back. Reconnect the arm to your torso and work to disrupt the figure four before the attacker also controls your shoulder line. Kimura defense instruction commonly emphasizes blocking movement behind the back, disrupting the grip, and restoring the arm’s relationship to the body (NAGA’s Kimura overview).
Grip fighting here should be technical, not frantic. Practice the grip break appropriate to the position with your coach.
Stage three: Alignment recovery
If the grip is established but finishing pressure has not developed, seek safer arm alignment and improve your body position. Depending on the configuration, coached defense may involve changing the hand connection, straightening the arm, turning, or moving the torso.
Those are categories, not universal prescriptions. The correct direction changes with the attacker’s leg position, head placement, torso control, and whether you are on top or bottom. Avoid explosive rotation and do not improvise a roll.
Stage four: Late danger
When your arm is isolated, movement is restricted, and the attacker can direct the hand behind your back, tap early. Do not wait for sharp pain or try to establish how much farther the joint could move.
Use a clear physical tap when possible and a loud verbal tap if your hands are trapped. The attacker must maintain gradual pressure, recognize either signal, and release immediately. If the defender moves unpredictably, the attacker should release rather than trying to follow the joint through a scramble.
Practice defense in this order:
- posture and elbow discipline;
- denying wrist control;
- disrupting the forming figure four;
- restoring alignment under light, coached resistance; and
- only then, carefully supervised late-stage escape work.
Kimura vs. Americana, the 1951 Naming Story, and a Safe Drilling Plan
The Kimura and Americana commonly use the same basic figure-four architecture: one hand controls the opponent’s wrist while the other connects to the attacker’s own wrist. Their principal distinction is rotational direction.
A Kimura directs the hand behind the back through internal rotation. An Americana rotates the bent arm in the opposite direction. NAGA’s comparison similarly describes the Kimura as taking the arm behind the back and the Americana as rotating the arm upward (NAGA’s Americana and Kimura comparison).
Because the attacks share a related grip structure, the opponent’s arm position or defensive rotation may create a transition from one to the other. That does not justify twisting back and forth against resistance. Remove finishing pressure, preserve positional control, and re-establish safe alignment before changing rotational direction.
The BJJ name has a clearer account than the lock’s deeper origin. Masahiko Kimura defeated Hélio Gracie with gyaku ude-garami in Rio de Janeiro on October 23, 1951, after which the lock became associated with Kimura’s name in BJJ (BJJ Heroes’ account of the Kimura–Gracie match).
The underlying lock predates that match, and its deeper origin remains uncertain. Accounts connect similar holds to multiple grappling traditions. Popular retellings also include claims about crowd size, weight disparity, injuries, and special match conditions, but those details should not be treated as settled without stronger contemporary documentation. Masahiko Kimura did not invent the underlying hold merely because BJJ adopted his name for it.
A supervised drilling progression
Beginners should learn control and escape awareness before treating the Kimura as a submission race. That is consistent with MMA Spark’s beginner-training philosophy, which places positional fundamentals and escapes before submission-first training.
Use this progression with a qualified coach:
- Agree on intensity and taps. Establish both a physical and verbal signal.
- Build the grip cooperatively. Use no finishing rotation; learn where each hand and forearm belongs.
- Pass the five checkpoints. Retain the wrist, contain the elbow, control the torso, remove space, and create an angle.
- Practice positional retention. The defender gives light, predictable movement while the attacker keeps the connection without finishing.
- Add slow finishing mechanics. Begin from a stable end position, add minimal gradual pressure, tap early, and release immediately.
- Practice early defense. Work on posture, elbow discipline, wrist-control denial, and grip disruption.
- Add reaction-based transitions. The defender provides one agreed response; the attacker selects a coached sweep, pass, positional improvement, alternate attack, reset, or release.
- Introduce limited positional resistance. Keep the goal narrow and stop whenever alignment becomes unclear.
Progress according to technical consistency, partner behavior, and your coach’s judgment—not impatience.
Frequently Asked Questions
Which joints does a BJJ Kimura attack?
The Kimura primarily creates internal rotation at the shoulder as the hand is directed behind the back. It can also stress the elbow, especially when alignment changes, the arm begins to straighten, or resistance redirects force through the joint. Available injury discussions identify both the shoulder and elbow as relevant, while noting that Kimura-specific biomechanical research remains limited (Western Slope Rehab and Performance’s injury overview).
The exact loading depends on position, anatomy, control, and movement. That variability is one reason to use gradual pressure and avoid diagnosing the lock only by where the defender first feels discomfort.
Is a Kimura the same as an Americana?
No. They commonly share a bent-arm figure-four grip, but they rotate the arm in opposite directions. The Kimura takes the hand behind the back through internal rotation; the Americana rotates the bent arm the other way.
An opponent’s defensive reaction may create a transition between them, but the attacker must remove finishing pressure, maintain positional control, and avoid abruptly reversing rotational force.
Can the Kimura grip be useful if the submission is not available?
Yes. The grip can restrict rotation and create leverage for sweeps, passes, turnovers, back exposure, armbars, triangles, and positional improvement.
Those outcomes are possibilities rather than guarantees. If maintaining the grip damages your balance, costs the position, or puts the shoulder into an uncontrolled exchange, release it.
Should I use a thumbless grip for every Kimura?
Not necessarily. A thumbless grip is one documented instructional option, but grip details can vary with position, hand size, friction, ruleset, movement, and coaching method.
Judge the grip as part of the full structure. No hand configuration compensates for a lost wrist, mobile elbow, uncontrolled torso, excessive space, or poor angle.
Why is the lock called the Kimura?
In BJJ, the name is associated with Masahiko Kimura’s use of gyaku ude-garami to defeat Hélio Gracie in 1951. The lock itself existed before that match, and its deeper origin is uncertain.
The name therefore commemorates a famous application, not the invention of the underlying hold.
The durable lesson is control before submission. Connect securely to the wrist, isolate the elbow, control the torso, remove space, create an appropriate angle, and rotate gradually with your whole body. Practice those checkpoints with a qualified coach. When resistance removes safe shoulder movement, treat it as a cue to improve position, transition, or release—not to wrench harder. Early tapping and immediate release are nonnegotiable.